Wednesday, June 29, 2011

An Engagement Anniversary

Exactly 1 year ago today after a hard days snowboarding Corey and I got engaged! I can't believe it has been a year already since we became engaged. We have been planning our wedding for exactly a year. It scares me a little because it means this last 4 months before the wedding is going to super duper fast.

Anniversary Cupcakes

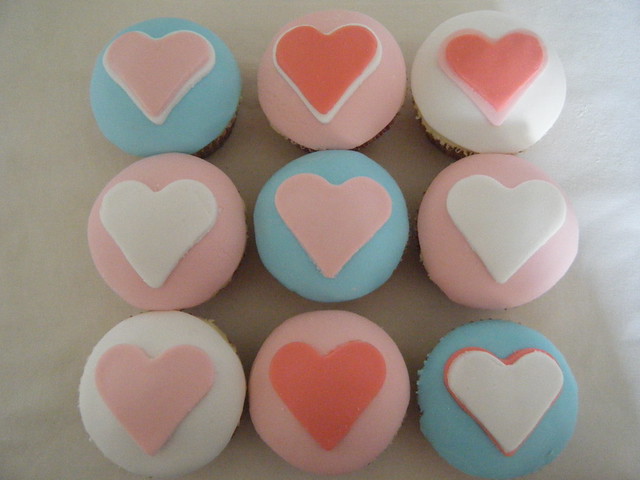
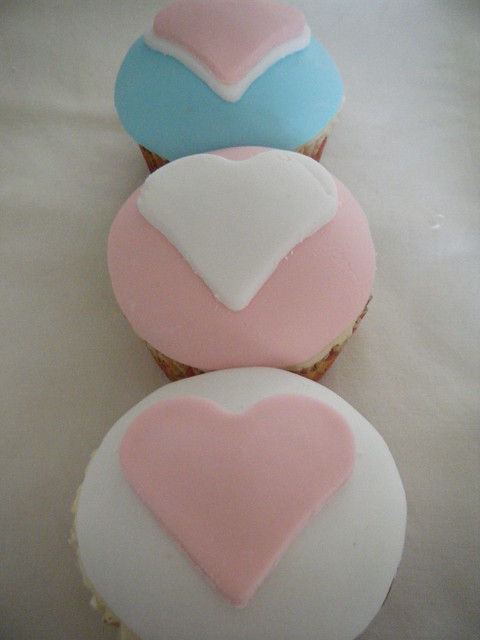
To celebrate the occasion I decided to bake cupcakes. Cupcakes are my go to for any celebration! I used this tutorial from Little Betsy Baker as my inspiration.

Anniversary Cupcakes

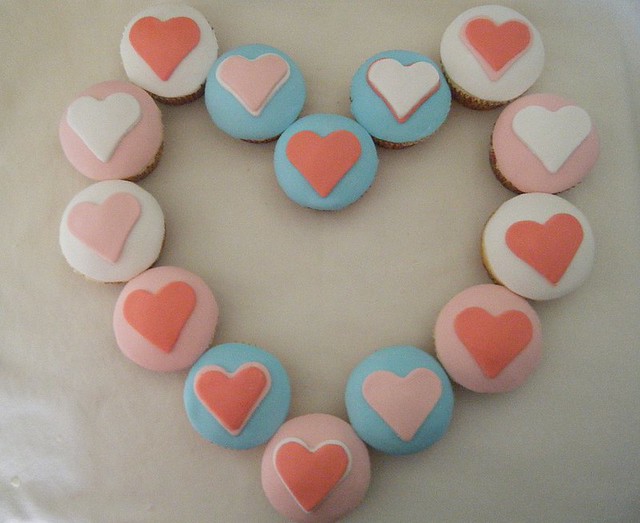
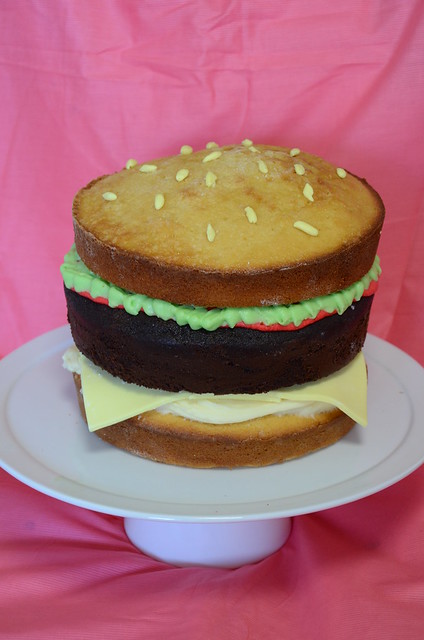
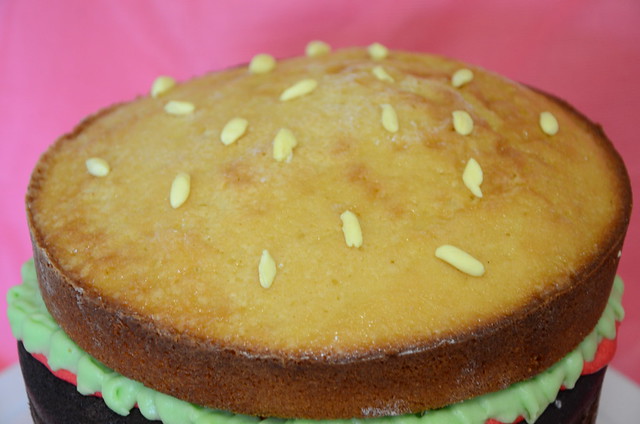
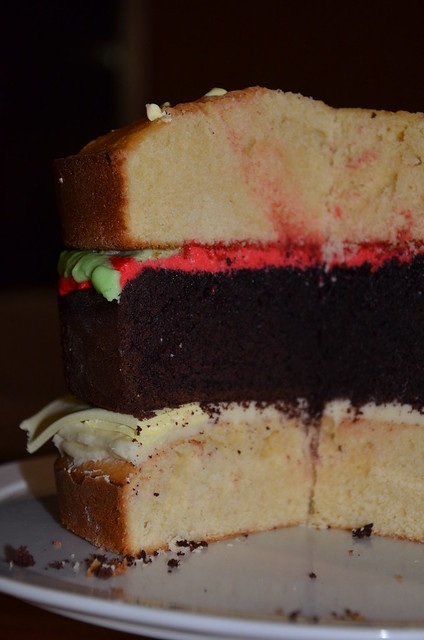
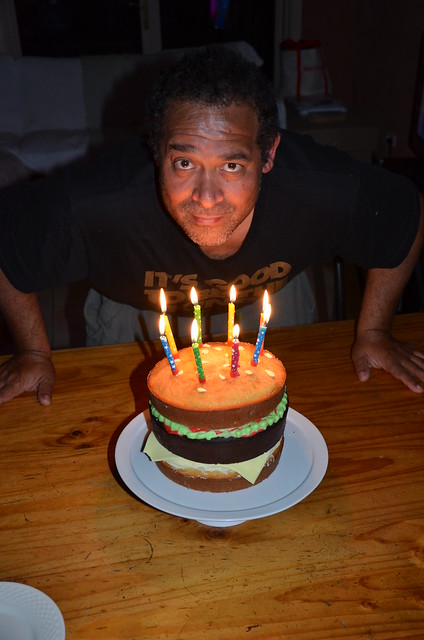
After using fondant on dad's burger cake I was really keen to try using it again. This time I made a trip to the local cake decorating shop and bought myself some gel paste colours. They were so much easier to work with than the liquid colouring I used last time.

Anniversary Cupcakes

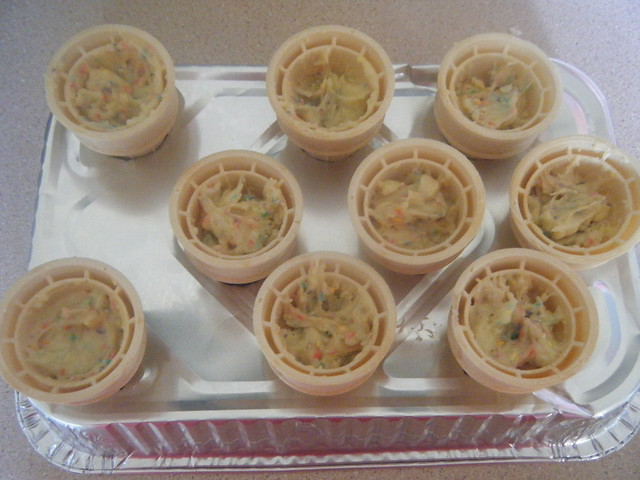
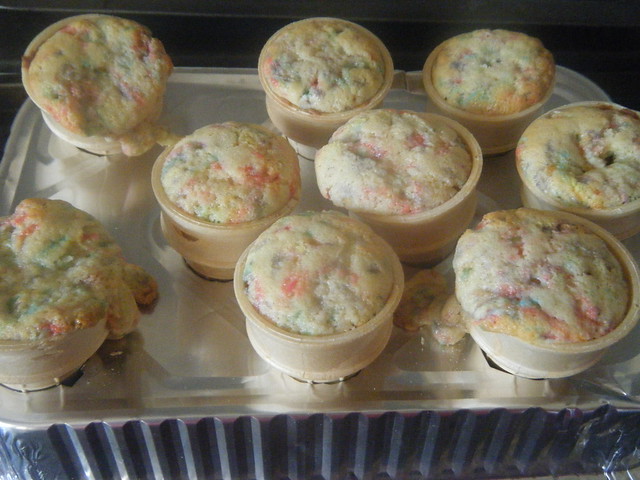
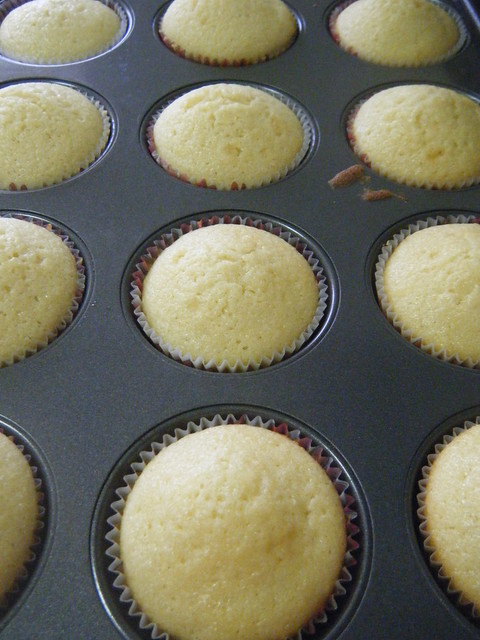
I used a vanilla cupcake recipe from my Planet Cake book and I must say I love this recipe. I am not sure what they taste like yet because I am waiting for Corey to get home from work before I eat one but they are the most perfect looking cupcakes I have ever made.

Anniversary Cupcakes

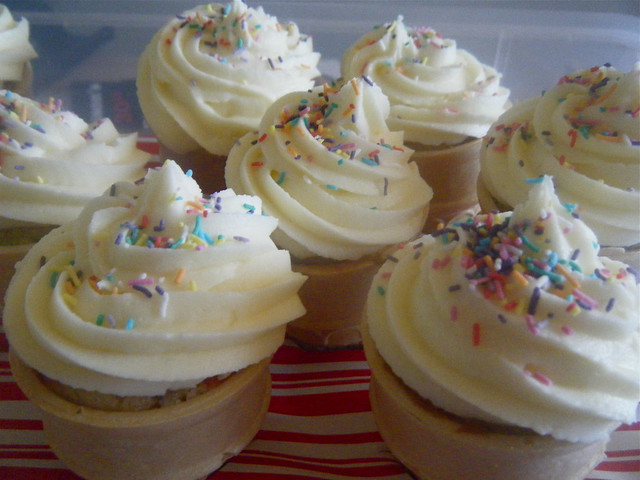
I covered the cupcakes in buttercream which I set let set in the fridge before hot knifing smooth. Then I covered them in fondant. For all you cake decorators out there do you use buttercream under your fondant or ganache? I have heard you can use both but is one better than the other. What do you prefer?

Anniversary Cupcakes

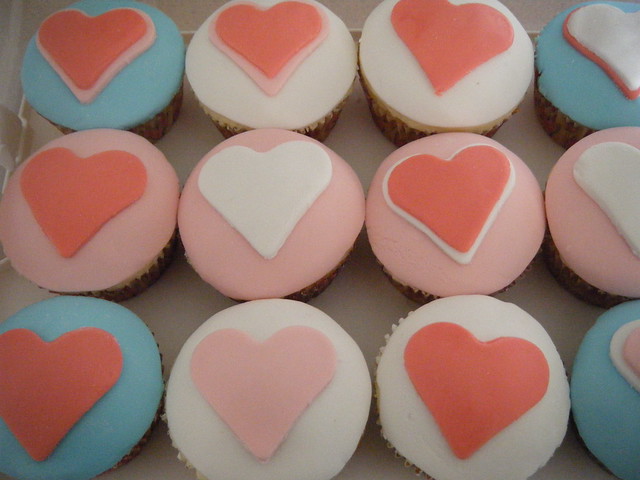
I am so happy with how these cupcakes turned out. They are not perfect by any means but they are a good start. I am excited to keep trying and keep learning and hopefully one day my cupcakes will look as good as the Planet Cake ones.

Monday, June 27, 2011

A Post of Many Firsts

New Look 6252

Today I finally finished a sewing project that crossed off a couple of firsts for me. My first vintage sewing pattern and my first pair of shorts. Making a pair of shorts was one of my goals for my 101 in 1001 and I am so happy I can cross it off my list. To start sewing with vintage patterns was one of my new years resolutions for this year. It has only taken me half the year to get started on that goal. Woops! I have another 2 in my stash I want to make as well before the year is out.

New Look 6252


Sewing shorts was not as difficult as I expected it to be. These are not the most perfect pair of shorts in the world but they fit without any alterations which I was surprised about.

New Look 6252

I used New Look 6252 which I bought from the op shop for $2. The material was purchased at Spotlight about a year ago and I can't for the life of me remember what sort of fabric it is. I know it is something the usually use to make school shorts. It is extremely soft which makes them super comfortable.

New Look 6252

I am really happy with how these shorts turned out. They made me realise that no matter how scary I think a sewing project is if I just jump in and give it a go I can make anything.

New Look 6252

I was going to make a scalloped hem on the shorts but I had a bit of difficulty with it and decided to leave it for another garment. Because I was imagining them with scalloped hems once I finished them they looked a little boring. I added in the black bow for the photos but I am thinking of possibly adding some black trim to the hems and pockets but I am not sure yet.

New Look 6252

Although a nice pair of basic shorts would work quite well in my wardrobe so maybe I will just leave them plain. We'll see!

Saturday, June 25, 2011

Ice-cream Cone Cupcakes

Ice-cream Cone Cupcakes

Today was our nephew Isaac's 2nd birthday party and I decided to make some cupcakes to take along. I had been wanting to make ice-cream cone cupcakes for so long and this was the perfect excuse.

Ice-cream Cone Cupcakes

I used these ice-cream cones from Woolworths and the baking trays I got from Coles but apparently you can get them at Dimmey's really cheap if you happen to have a Dimmey's nearby. The baking trays are to help the cones stand up while you are baking them and they also work well for displaying the cupcakes.

Ice-cream Cone Cupcakes

I found a circular object that was slightly larger than the cones and traced it onto the bottom of the trays. I then used Corey's stanley knife to cut out the holes to stand the cones in. I then placed the baking tray on top of a normal biscuit tray to put in the oven.

Ice-cream Cone Cupcakes

When you are filling your cupcake cones make sure you don't fill them too much. I kind of experimented on the first tray of cupcakes to see how much I needed to fill them and then the second tray came out perfect. My first tray came out like this....

Ice-cream Cone Cupcakes

No worries though! Corey was more than happy to pick off and eat the spilled over bits of cake. After I had baked the cakes I covered the trays in wrapping paper to make them a bit more presentable for the party. I think they looked quite cute!

Ice-cream Cone Cupcakes

My only suggestion if you are going to make these would be to make them for a party at home. They are a royal pain in the butt to transport as they are so tall. I had mine in a container with glad wrap and chopsticks holding up the gladwrap. Next time I make them I think I will make them when I don't have to transport them.

Ice-cream Cone Cupcakes

Oh and excuse the crappy photos. I had to return the Nikon D7000 I was borrowing from my friend so I am back to a point and shoot until I get around to buying a new camera.

Thursday, June 23, 2011

Summer Wedding Dress

Thank you to everyone who made pattern suggestions for me yesterday. The general consensus was Vogue 1094 which I think will be perfect!

The bodice is pretty much perfect. The only change I think I would like to make is to make the waist sit a little higher. Drop waists do not work well on me. Also I think I will change the skirt from a gathered skirt to a more a-line skirt to match the original dress. You can see in the photo below that the coral dress has two pleats on either side where the back only has one pleat either side. I am not sure whether to try and find a pattern for a skirt like this or to just draft one myself.
Decisions, decisions!!! Now all I need to do is figure out what colour I want to make it in. I am thinking a nice royal blue or even a kelly green. I do love this version of the dress which I found yesterday...

polka dots and pup

It is by Vintage Laura who by the looks of things does not have a blog but you can check out all her sewing creations in her flickr photostream.

Wednesday, June 22, 2011

Pattern Help!

Okay guys I need a little bit of help to find a pattern to make a dress. I found this stunning dress last night which I want to wear to my aunty's wedding in December. Unfortunately the only Australian store that has it in coral has sold out. I found another store that has it but only in black which is a wedding no-no. So I was hoping that maybe I could make something similar.
My question is does anyone know of a pattern that I could use to make a top like that? Or would I have to draft my own which I have never done before so I am a little scared of. If anyone has any suggestions at all they would be greatly appreciated.

Sunday, June 19, 2011

Dad's Burger Cake

Wednesday is my dad's birthday but since he works nights and we do family dinner on Sundays we decided that tonights dinner would be his birthday dinner. Then Wednesday we are going out to breakfast and next Saturday we are going out for dinner. So really we are going to be celebrating birthday week. I was in charge of making the cake and decided to make him a burger cake after seeing a few around the internet.


Burger Cake


I used a bit of each of the cakes I saw online to make my cake. I used 2 recipes from Crabapple Bakery recipe book. I used the basic vanilla cupcakes recipe and the basic chocolate cupcakes recipe. I split the vanilla batter into two cakes and then for the chocolate I just made half of the batter.


Burger Cake


The "mayo" was made from cream cheese icing and the "cheese" was made from fondant. This was my first time using fondant and it was a lot easier to use than I expected. Colouring of it was a bit of a pain because I only had liquid colouring. I think next time I make a fondant cake I will try and get colouring paste or possibly buy coloured fondant.


Burger Cake


For the "lettuce" and "tomato sauce" I made a batch of buttercream icing which I then split into two bowls and coloured with liquid colouring. The red icing took nearly half a bottle of colouring to get the right colour. For the "tomato sauce" I simply spread the icing over the chocolate cake but for the lettuce I piped it in a ruffle around the cake with a petal tip.


Burger Cake


I also used some fondant to make "sesame seeds". I just rolled a small amount of fondant into a ball then pinched one end to give it a seed shape. The fondant was slightly sitcky from being rolled so they stuck to the top of the cake quite easily.


Burger Cake


This is by far the coolest cake I have ever made! I had so much fun making it and dad loved it. Let me warn you though if you are going to make this cake you only need to cut the tiniest slivers to eat. There is so much cake and icing you can only eat a tiny piece at a time.

Burger Cake

And here is one last photo of dad and his cake. Happy Birthday week dad!


Thursday, June 16, 2011

No. 48 Make Bread From Scratch

No. 48 on my list of 101 in 1001 is to make bread from scratch. Last weekend I decided to finally have a go at making some bread and boy am I glad I did because it was delicious!!!

No. 48 - Bread

I used a basic white bread recipe from Women's Weekly Cook and it was super quick and easy to follow. I took the bread around to my mum and dad's when it was fresh out of the oven and we had it with butter and jam. Yummy!!!

Basic White Bread by Women's Weekly Australia

3 tsp dry yeast
1/2 cup warm water
2 tsp caster sugar
2 1/2 cups plain flour
1 tsp salt
30g butter melted
1/2 cup warm milk

Whisk yeast, water and sugar in small bowl until yeast dissolves. Cover and set aside for about 10 minutes or until mixtures is frothy.

Sift flour and salt into large bowl. Stir in butter, milk and yeast mixture. Turn dough onto floured surface and knead for 10 minutes or until dough is elastic. Place dough into greased bowl, cover and stand in a warm place for 1 hour or until dough has doubled in size.

Preheat oven to 200 degrees celsius (180 for fan forced). Grease oven tray.

Turn dough onto floured surface and knead until smooth. Roll dough into 18cm x 35cm rectangle. Roll up from short side like a swiss roll. Place on tray and cut four diagonal slashes across top. Cover and stand for 20 minutes or until risen. Bake, uncovered, for 45 minutes. Turn onto a wire rack and cool.

Wednesday, June 15, 2011

Mini Hat

Last night I quickly knit up this little hat just for the fun of it. Not sure what I am going to do with it yet so it has been put away in the gift box for later.

Mini Hat

Needles: 5mm circulars
Yarn: Moda Vera Shiver (1 ball)
Time Taken: 2 hours
Actual Knitting Time: 2 hours

There is nothing like a bit of instant gratification knitting. Now I am off to start a slightly bigger project.

Tuesday, June 14, 2011

Mango Sorbet Cardigan

The long weekend gave me plenty of time to finish up this cardigan that I have been working on for the past few weeks. I am really happy with how it turned out and know that I will actually wear it. Apart from the beanies and scarves I have knitted which I wear all the time I have knitted myself about 3 garments Shalom, Ruby & Lelah. None of which I ever wore! Ruby & Lelah turned out too small and the yarn I used for both did not give at all when blocking so they were never worn. Shalom was great and fit perfectly but it just wasn't my style so again I never wore it. Ruby I would like to make again and this time I will knit a guage swatch to make sure it will fit me.

Mango Sorbet Cardi

Yarn: Carnival Soft 8 ply & Bella Baby 4 ply
Needle: 4.5mm circulars
Time Taken: 2.5 weeks
Actual Knitting Time: approx 17 hours

Anyway back to my new cardigan which I promise I will wear. I named it the Mango Sorbet Cardigan because the colours remind me of mango wiese bars. This cardigan ended up being a bit smaller on me then it is on everyone else. At first I thought it was just because of my tight knitting and the fact the pattern is for a size small but then I realised I used the wrong needles. I had my 4.5mm circulars in my 6mm circular case so I knit the whole thing in needles that were too small. Again, my fault for not paying attention but I am actually happy with how it turned out because now it is a crop cardigan which is my preferred style.

Mango Sorbet - Side

The pattern was not written very clearly but if you read over it a couple of times before starting you can figure out what is happening. I used Iz's notes on the increases for my increases which made them a lot easier to work out. I also followed suit after seeing Iz's finished cardi and left the ribbing off the sleeves on mine.

Mango Sorbet - Back

All in all I am very happy with how this turned out and would definitely make it again. I am so happy to have finally made a knit garment that I will actually wear. I have also learnt that from now on no matter how much I just want to get on with knitting the garment I will knit a guage swatch first. Oh and before I go Corey wanted me to share this picture with you....

Mango Sorbet - Outtake

He took it while I was explaining what photo I wanted him to take of my cardi and he though it was hilarious!

Monday, June 13, 2011

Daily Style - Polka Dots

Daily Style - Polka Dots

Belt: Poundland
Cardi: Valleygirl
Shoes: Rubi Shoes
Flower (in hair): Diva

Thanks to the public holiday I got to spend an extra two days with Corey this weekend. Corey and I usually only have one day off a week together because he works on Saturdays but this weekend he took Saturday off and thanks to the public holiday had Monday off too. We spent the day buying a few wedding things, going out for lunch and going to watch the new X-men movie. It was a lovely relaxing day to end a lovely long weekend.

Daily Style - Hair

I wore one of the dresses that I bought from Kitty's Vintage Kitsch before I put myself on a shopping ban. I love this dress! It is so summery and fun. It came with a matching belt with a butterfly buckle but I like to wear it with this red on instead. Blue and red together are one of my favourite combinations. I also finished a cardigan I have been knitting for the past few weeks so stay tuned for a post on that.

Wednesday, June 8, 2011

Roko The Monkey

Last night I finally finished this monkey I have been working on for our new nephew who is due in about 5 weeks. I named him Roko because that is one of the name's being tossed around by the parent's to be for the little bubba. Roko is the name of one of the uncles of bubba to be.

Roko The Monkey

Needles: 3.25mm straight
Yarn: Moda Vera Marvel Plain 8ply
Time Taken: 2.5 weeks
Actual Knitting Time: approx 12 hours.
Raveled here

Roko The Monkey

I always expect small toys like this to be quick to knit up but I forget they have to be knitted in tiny pieces that then all have to be joined together and all the ends sewn in. Although however long they seem to take me I always get a lot of joy out of knitting toys. They are just so cute and you can change their personality simply in the way you embroider their facial features. We also have another nephew due in September and I have a new baby cousin due in October who I am also going to knit something up for. I knitted a bunny rabbit which you can see here for the last baby born in our family so this is kind of become a tradition for me.

I was also thinking of doing up some tutorials and posts about learning to knit. I really love knitting and I always get comments from people saying they want to learn how to knit. I thought I could do some basic posts about different yarns and needles to begin with then some videos on casting on, knit, purl, casting off and the maybe branch out into increasing and decreasing and maybe some more difficult stitches. Let me know if that is something you would be interested in cause I think it would be fun!